
Notes on Priming Coils - Tips and Advice
Notes on Priming Coils
What is a Vape Coil?
In todays market most e cigs or vape kits feature replaceable 'atomizer heads' also known as coils. These are often just referred to as 'coils' and contain the coil wire and wicking material. The wick soaks up the e-liquid and the coil wire heats the juice up and turns it into vapour. Most coils contain either cotton or ceramics as the wicking material.
What Does Priming a Coil Do?
Priming a coil simply means allowing time for e-liquid to fully saturate the wicking material in your coil head. This will stop the wick from burning when you activate the battery. This is also known as a 'dry hit', which tastes pretty awful. If you've experienced a dry hit, you will know!
Please note that you will only need to prime a vape coil the very first time you use it. Make sure you follow the below steps whenever you go to use a new coil.
You can find out more about how often you should replace your coils later on in this guide.
How to Prime a Vape Coil?
To prime a new coil, simply fill your tank with e liquid and leave it to stand for a few minutes before vaping. As above, this will allow the cotton inside your new coil to absorb plenty of e-liquid ready for that first, smooth vape.
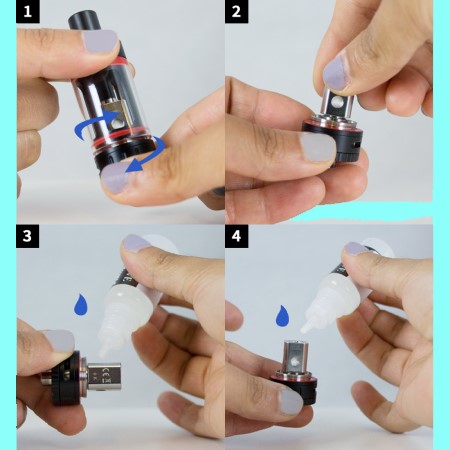
Alternatively, you can drip your vape juice directly into the cotton in the airholes in your coil then leave it for a few minutes. You can then screw the coil back into your tank and fill it with e-liquid.
How Long Should You Prime a Vape Coil For?
It's always recommended to leave your coil to prime for as long as possible - anywhere between 5-30 minutes. The longer you leave it the better, but most coils should be ready to vape after around 5-10 minutes.
Due to the viscosity of the ingredients in eliquids with a higher PG content will take less time to saturate a coil. Those with a higher VG content tend to be thicker and will take longer.
The importance of proper coil priming
Your coil is the heart of your vaping device. These heating elements are there to turn your e-liquid into vapour. Generally, with a manufactured coil, a heating element is encased in cotton. The cotton holds the liquid, enabling it to be vaporised once you apply power from your battery.
When to replace your coils
Coils will need replacing periodically; the length of time between changes depends on a number of factors. The amount of device use, power settings, chosen e-liquid, and other variables, all affect the lifespan of the coil. Generally you would want to replace your coil as and when you encounter a burnt or poor taste from your atomiser.
Quick tips on Priming Coils
- Always prime your coils well when using for the first time.
- Add 5 or so drops to the centre of the coil saturating the cotton
- Reassemble the tank making sure the coil is secured in place
- Add your chosen liquid to the tank
- Take 5 or so long drags on your device without power
- To be absolutely sure leave rested upright for a minute or so
- Inhale with small puffs initially 5-10 puffs
- If variable wattage device, then start at its lowest setting, going up in increments of 3-5 watts; till you get to your desired setting.
Tips
If you encounter 'spitting' from the device and a general gurgling sound when firing it, then the likelihood is your coil has become flooded. This can happen when the device is sat for any period of time or if the coil still has liquid inside from the priming process.
If this occurs, simply remove the mouthpiece if it can be, then flick the device down towards the floor (preferably outside!). This action will allow the excess liquid to vacate the coil and when you next fire the device that gurgling sound should have gone.
How do you prime Mouth to Lung (MTL) coils?
If your coil has a high resistance (for example, above 1.2 Ω) you can choose to simply leave it in the tank and allow it to soak into the coil.
You can also remove the coil and prime it by hand. When you remove it, look closely at the coil – you should see some holes in it. Drip e-liquid into these holes. You’ll also see a hole at the top of the coil – put a little e-liquid in here too, until the wicking is saturated.
After adding e-liquid to your tank, you should still leave the coil to soak for a few minutes before using it for the first time.
How do you prime sub-ohm coils?
If your coil has a resistance of lower than 1 Ω (these are known as sub-ohm coils) it’s worth taking extra care to prime the coils.
The lower the resistance of the coil, and the higher the power levels you are using, the more care you need to take.
Ensure that you add plenty of e-liquid via the ports and the top of the coil. Once again, after doing this, and adding your e-liquid, leave the e-liquid to soak into the coil further – the lower the resistance of the coil, the longer you should leave it.
You can also take a couple of priming puffs. To do this, inhale without pressing the fire button. This helps draw the e-liquid into the coil. 1 or 2 puffs should be enough, though, as you don’t want to flood the coil.